ML 모델 사용하여 Web App 만들기
서론
UFO 목격 제보에 관련된 일부 데이터로 모델을 만들 것이다. Scikit-learn을 사용하여 만든 모델을 웹 어플리케이션에서 예측할 때 사용할 수 있는 파일로 저장할 것이다. Flask를 이용하여 저장한 모델을 웹 앱에서 사용할 것이다.
먼저 UFO 목격 제보에 관련된 일부 데이터로 모델을 만들고, 시간(초) 위도 경도 값을 입력받아 UFO가 보고된 나라를 예측할 수 있는 웹앱을 만들 것이다.
Microsoft팀의 ML-For-Beginners 리포지토리의 3장 내용을 바탕으로 만들었습니다.
https://github.com/microsoft/ML-For-Beginners/tree/main/3-Web-App
사용할 Tools
- Flask
- Flask는 Python으로 웹 프레임워크의 기본적인 기능과 웹 페이지를 만드는 템플릿 엔진을 제공합니다.
- Pickle
- Pickle 🥒은 Python 객체 구조를 serializes와 de-serializes하는 Python 모듈입니다. 모델을 ‘pickle’하게 되면, 웹에서 쓰기 위해서 serialize 또는 flatten합니다.
- 주의합시다: pickle은 원래 안전하지 않아서, 파일을 ‘un-pickle’한다고 나오면 조심합니다. pickled 파일은 접미사
.pkl로 있습니다.
데이터 정리
NUFORC (The National UFO Reporting Center)에서 모아둔, 80,000 UFO 목격 데이터를 이 강의에서 사용합니다.
데이터는 설명으로 되어있다.
- 긴 예시를 설명합니다. ”A man emerges from a beam of light that shines on a grassy field at night and he runs towards the Texas Instruments parking lot”.
- 짧은 예시를 설명합니다. ”the lights chased us”.
ufos.csv 스프레드시트에는 목격된 city, state 와 country, 오브젝트의 shape 와 latitude 및 longitude 열이 포함되어 있습니다.
-
pandas,matplotlib, 와numpy를 import하고 ufos 스프레드시트도 import합니다. 샘플 데이터셋을 볼 수 있습니다:import pandas as pdimport numpy as npufos = pd.read_csv('./data/ufos.csv')ufos.head() -
ufos 데이터를 새로운 제목의 작은 데이터프레임으로 변환합니다.
Country필드가 유니크 값인지 확인합니다.ufos = pd.DataFrame({'Seconds': ufos['duration (seconds)'], 'Country': ufos['country'],'Latitude': ufos['latitude'],'Longitude': ufos['longitude']})ufos.Country.unique() -
지금부터, 모든 null 값을 드랍하고 1-60초 사이 목격만 가져와서 처리할 데이터의 수량을 줄일 수 있습니다:
ufos.dropna(inplace=True)ufos = ufos[(ufos['Seconds'] >= 1) & (ufos['Seconds'] <= 60)]ufos.info() -
Scikit-learn의
LabelEncoder라이브러리를 Import해서 국가의 텍스트 값을 숫자로 변환합니다:✅ LabelEncoder는 데이터를 알파벳 순서로 인코드합니다.
from sklearn.preprocessing import LabelEncoderufos['Country'] = LabelEncoder().fit_transform(ufos['Country'])ufos.head()데이터는 이렇게 보일 것입니다:
    Seconds Country Latitude    Longitude
2   20.0    3       53.200000   -2.916667
3   20.0    4       28.978333   -96.645833
14  30.0    4       35.823889   -80.253611
23  60.0    4       45.582778   -122.352222
24  3.0     3       51.783333   -0.783333
모델 만들기
지금부터 데이터를 훈련하고 테스트할 그룹으로 나누어서 모델을 훈련할 준비가 되었습니다.
-
X 백터로 훈련할 3가지 features를 선택하면, y 백터는
Country로 됩니다.Seconds,Latitude와Longitude를 입력하면 국가 id로 반환되기를 원합니다.from sklearn.model_selection import train_test_splitSelected_features = ['Seconds','Latitude','Longitude']X = ufos[Selected_features]y = ufos['Country']X_train, X_test, y_train, y_test = train_test_split(X, y, test_size=0.2, random_state=0) -
logistic regression을 사용해서 모델을 훈련합니다:
from sklearn.metrics import accuracy_score, classification_reportfrom sklearn.linear_model import LogisticRegressionmodel = LogisticRegression()model.fit(X_train, y_train)predictions = model.predict(X_test)print(classification_report(y_test, predictions))print('Predicted labels: ', predictions)print('Accuracy: ', accuracy_score(y_test, predictions))
당연하게, Country 와 Latitude/Longitude가 상관 관계있어서, 정확도 (around 95%) 가 나쁘지 않습니다.
만든 모델은 Latitude 와 Longitude에서 Country를 알 수 있어야 하므로 매우 혁신적이지 않지만, 정리하면서, 뽑은 원본 데이터에서 훈련을 해보고 웹 앱에서 모델을 쓰기에 좋은 연습입니다.
모델 ’pickle’하기
모델을 pickle 할 시간이 되었습니다! 코드 몇 줄로 할 수 있습니다. pickled 되면, pickled 모델을 불러와서 초, 위도와 경도 값이 포함된 샘플 데이터 배열을 대상으로 테스트합니다.
import picklemodel_filename = 'ufo-model.pkl'pickle.dump(model, open(model_filename,'wb'))model = pickle.load(open('ufo-model.pkl','rb'))print(model.predict([[50,44,-12]]))
모델은 영국 국가 코드인, ‘3’ 이 반환됩니다. Wild! 👽
Flask 앱 만들기
지금부터 Flask 앱을 만들어서 모델을 부르고 비슷한 결과를 반환하지만, 시각적으로 만족할 방식으로도 가능합니다.
- ufo-model.pkl 파일과 notebook.ipynb 파일 옆에 web-app 이라고 불리는 폴더를 만들면서 시작합니다.
-
폴더에서 3가지 폴더를 만듭니다: static, 내부에 css 폴더가 있으며, templates` 도 있습니다. 지금부터 다음 파일과 디렉토리들이 있어야 합니다:
web-app/
  static/
    css/
    templates/
notebook.ipynb
ufo-model.pkl
✅ 완성된 앱을 보려면 solution 폴더를 참조합니다
-
web-app 폴더에서 만들 첫 파일은 requirements.txt 파일입니다. JavaScript 앱의 package.json 처럼, 앱에 필요한 의존성을 리스트한 파일입니다. requirements.txt 에 해당 라인을 추가합니다:
scikit-learn pandas numpy flask -
지금부터, web-app 으로 이동해서 파일을 실행합니다:
cd web-app -
터미널에서
pip install을 타이핑해서, requirements.txt 에 나열된 라이브러리를 설치합니다:pip install -r requirements.txt - 지금부터, 앱을 완성하기 위해서 3가지 파일을 더 만들 준비를 했습니다:
- 최상단에 app.py를 만듭니다.
- templates 디렉토리에 index.html을 만듭니다.
- static/css 디렉토리에 styles.css를 만듭니다.
-
몇 스타일로 styles.css 파일을 만듭니다:
body { width: 100%; height: 100%; font-family: "Helvetica"; background: black; color: #fff; text-align: center; letter-spacing: 1.4px; font-size: 30px; } input { min-width: 150px; } .grid { width: 300px; border: 1px solid #2d2d2d; display: grid; justify-content: center; margin: 20px auto; } .box { color: #fff; background: #2d2d2d; padding: 12px; display: inline-block; } -
다음으로 index.html 파일을 만듭니다:
<!DOCTYPE html>
<html>
  <head>
    <meta charset="UTF-8" />
    <title>🛸 UFO Appearance Prediction! 👽</title>
    <link rel="stylesheet" href="" />
  </head>
  <body>
    <div class="grid">
      <div class="box">
        <p>According to the number of seconds, latitude and longitude, which country is likely to have reported seeing a UFO?</p>
        <form action="" method="post">
          <input type="number" name="seconds" placeholder="Seconds" required="required" min="0" max="60" />
          <input type="text" name="latitude" placeholder="Latitude" required="required" />
          <input type="text" name="longitude" placeholder="Longitude" required="required" />
          <button type="submit" class="btn">Predict country where the UFO is seen</button>
        </form>
        <p></p>
      </div>
    </div>
  </body>
</html>
파일의 템플릿을 봅니다. 예측 텍스트: ``처럼, 앱에서 제공할 수 있는 변수 주위, ‘mustache’ 구문을 확인해봅니다.
/predict라우터에 예측을 보낼 폼도 있습니다.마지막으로, 모델을 써서 예측으로 보여줄 python 파일을 만들 준비가 되었습니다:
-
app.py에 추가합니다:import numpy as npfrom flask import Flask, request, render_templateimport pickleapp = Flask(__name__)model = pickle.load(open("./ufo-model.pkl", "rb"))@app.route("/")def home(): return render_template("index.html")@app.route("/predict", methods=["POST"])def predict(): int_features = [int(x) for x in request.form.values()] final_features = [np.array(int_features)] prediction = model.predict(final_features) output = prediction[0] countries = ["Australia", "Canada", "Germany", "UK", "US"] return render_template( "index.html", prediction_text="Likely country: {}".format(countries[output]) )if __name__ == "__main__": app.run(debug=True)💡 팁: debug=True를 추가하면 Flask 사용해서 웹 앱을 실행하는 도중에, 서버를 다시 시작할 필요없이 애플리케이션에 변경점이 바로 반영됩니다. 조심하세요! 프로덕션 앱에서 이 모드를 활성화하지 맙시다.
만약 python app.py 또는 python3 app.py를 실행하면 - 웹 서버가 로컬에서 시작하고, 짧은 폼을 작성하면 UFOs가 목격된 장소에 대해 주목받을 질문의 답을 얻을 수 있습니다!
하기 전, app.py의 일부분을 봅니다:
- 먼저, 의존성을 불러오고 앱이 시작합니다.
- 그 다음, 모델을 가져옵니다.
- 그 다음, index.html을 홈 라우터에 랜더링합니다.
/predict 라우터에서, 폼이 보내질 때 몇가지 해프닝이 생깁니다:
- 폼 변수를 모아서 numpy 배열로 변환합니다. 그러면 모델로 보내지고 예측이 반환됩니다.
- 국가를 보여줄 때는 예상된 국가 코드에서 읽을 수 있는 텍스트로 다시 랜더링하고, 이 값을 템플릿에서 랜더링할 수 있게 index.html로 보냅니다.
Flask와 pickled 모델과 같이, 모델을 사용하는 이 방식은, 비교적으로 간단합니다. 어려운 것은 예측을 받기 위해서 모델에 줄 데이터의 모양을 이해해야 한다는 것입니다. 모든 모델이 어떻게 훈련받았는 지에 따릅니다. 예측을 받기 위해서 3개 데이터 포인트를 넣어야 합니다.
웹앱 실행해보기
[app.py](http://app.py) 가 있는 위치에서 python [app.py](http://app.py) 를 터미널에서 동작시키면 로컬에서 웹앱을 켜볼수가 있다.
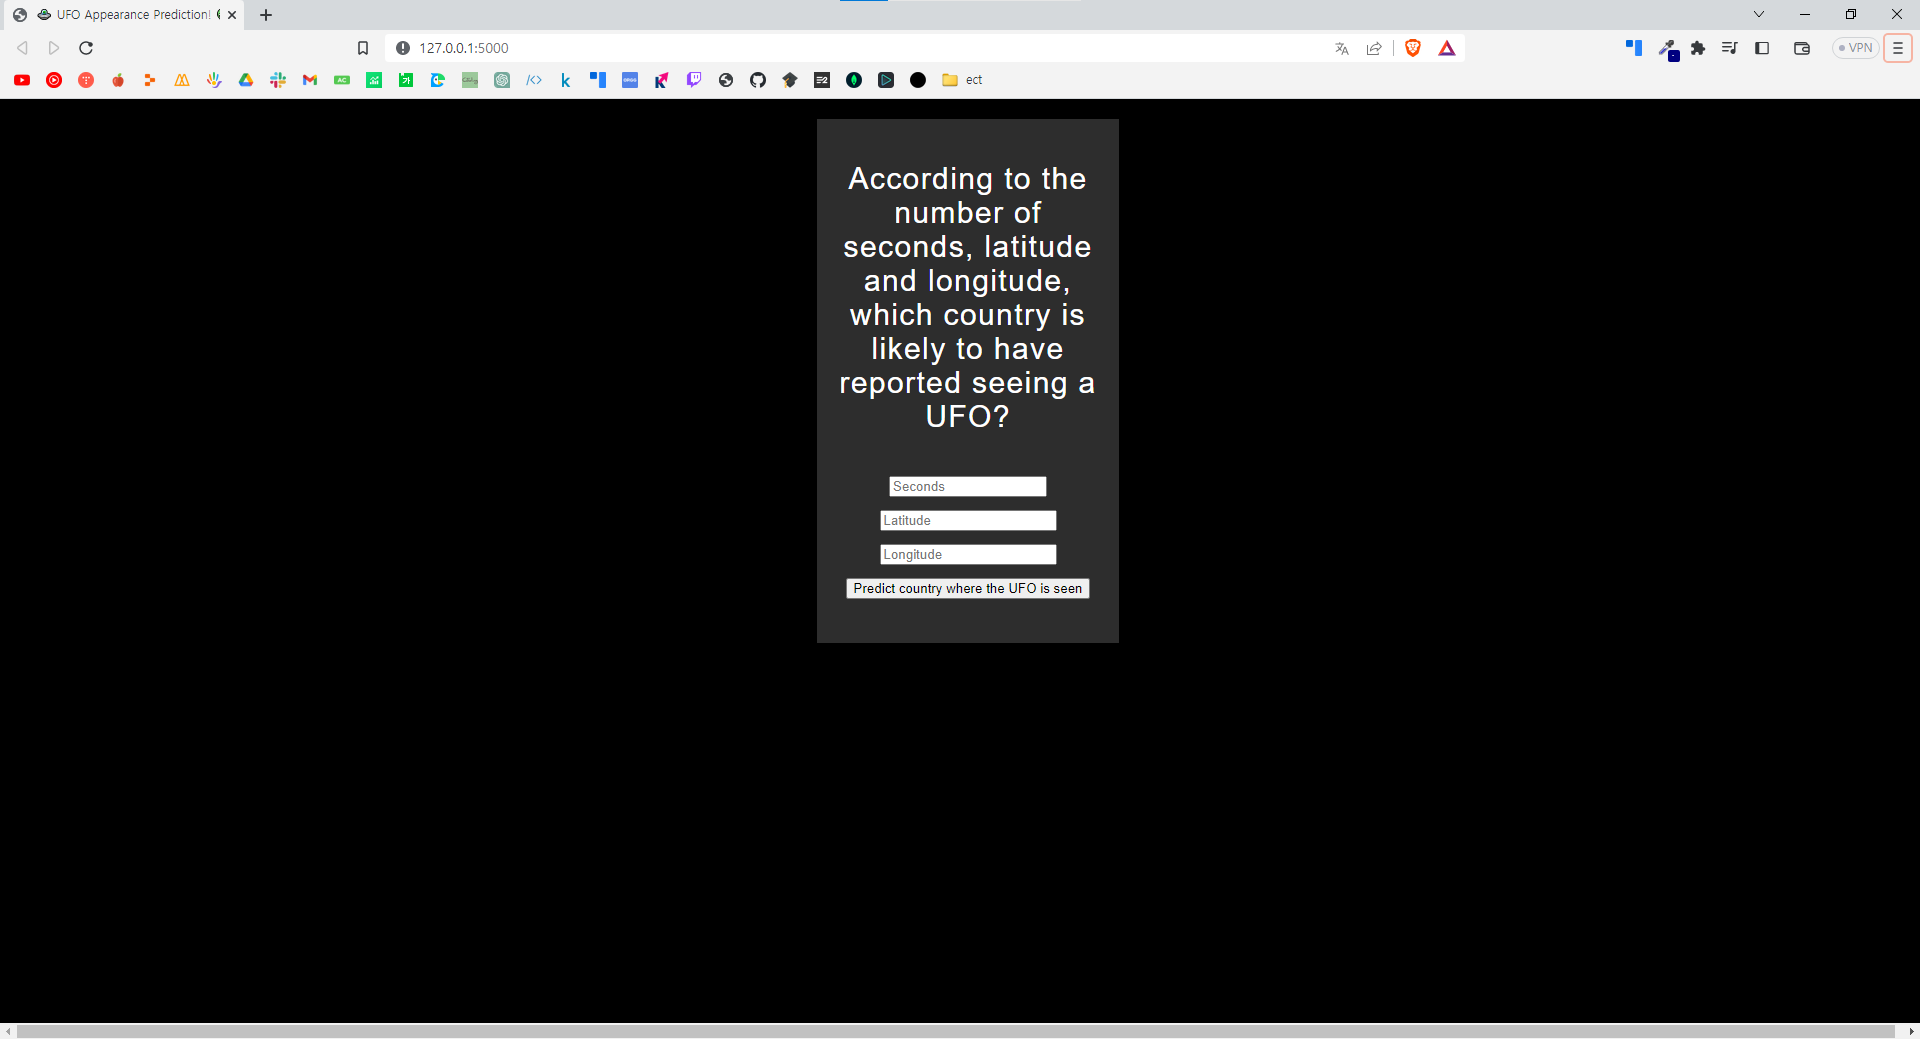
- 켰을 때 화면
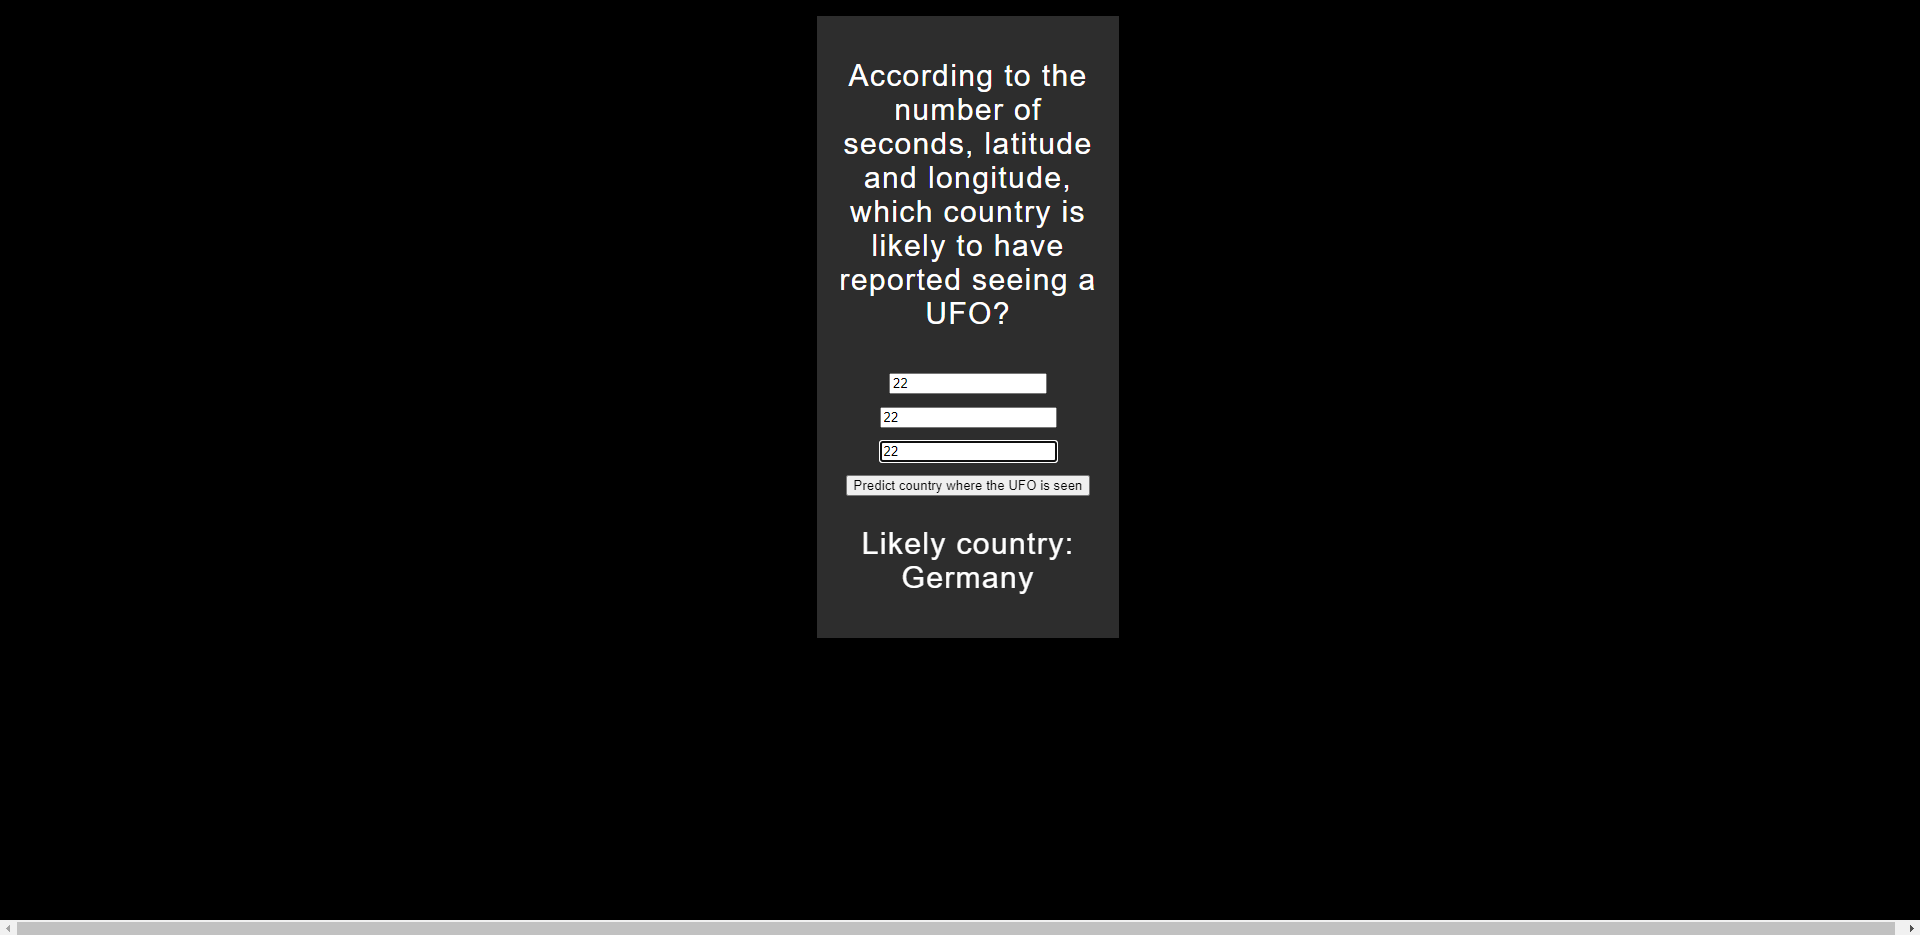
- 입력했을 때 화면
입력 : 22, 22, 22